 Today, I'm going to show you how I helped this travel blogger increase regular traffic to a blog post, going from about 9 pageviews per day to about 50 pageviews per day.
And this was a blog post that had been sitting there for YEARS without a budge in traffic.
I did it without any new promotion or any ad spend, and the traffic change happened immediately.
In this case study, I’ll walk you through the exact step-by-step process I used.
Meet Nora, The Professional Hobo

Nora Dunn is a financial-planner-turned-travel-blogger who’s been traveling full time and blogging about it on her site The Professional Hobo since 2007.
By 2018, that’s a lot of blog content.
The sheer volume of content on her site has helped bring in most of her site’s traffic through organic search, but she felt it should be bringing in more than it was.
She also knew she had plenty of valuable content in her backlog of posts, but no one was finding them.
So she asked a fellow travel blogger colleague, and he recommended me.
The Results…
I created a comprehensive plan that involved several different actions and techniques to boost the traffic on her whole site.
One action in particular brought super fast results for that page. Results like:
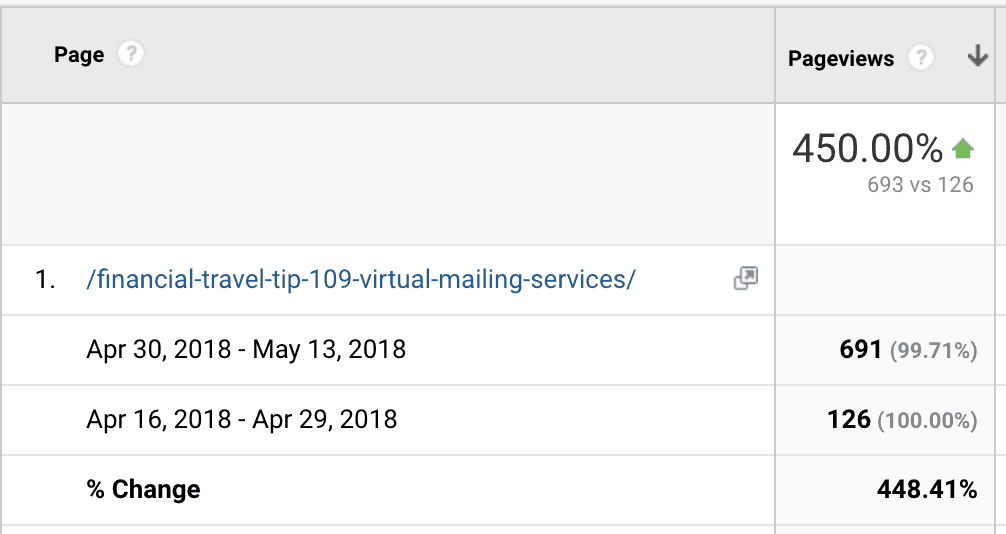
An average of 50 visits per day to a post that (for years!) used to average 9 visits per day.
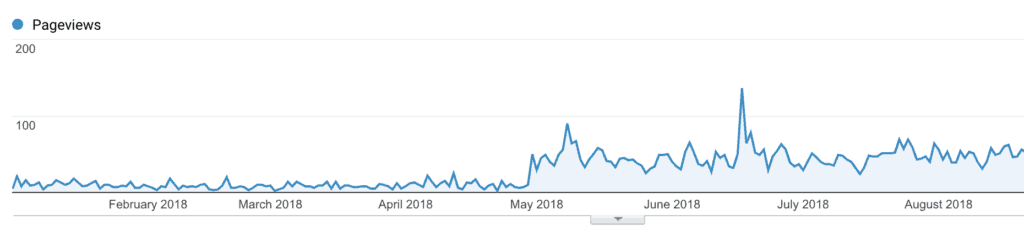
That’s a 450% increase!
Readers spending more time on the page, engaging with her content (87.4% increase!)
Lower rate of people bouncing off the page and not sticking around (4.5% decrease!)
And more affiliate sales and ad revenue!
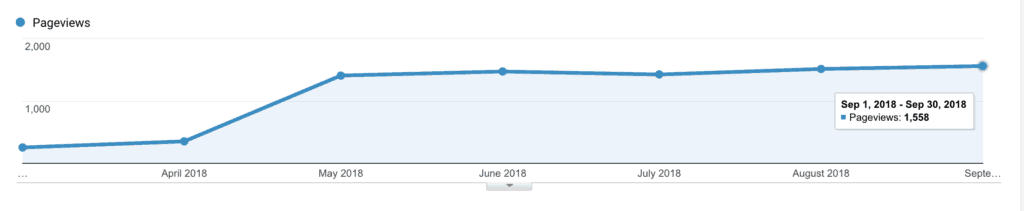
And the traffic just won’t stop coming. In September 2018, this page alone had 1,558 pageviews.
How I 5x’d traffic in one day: Republishing Old Content
Now, you’ve probably heard that you need to “update old content”, and maybe you’ve even heard that it might help with search engine stuff.
But this wasn’t just a quick edit making sure the facts were up-to-date and the links still worked.
By the time I was done, this puppy was twice as long as it had been, and it was strategically formatted around two keywords.
Let’s go step-by-step through the simple 5-part process I used to take this post from drab to the second most traffic-generating post on her site.
Step #1: Find an under-performing post with plenty of SEO potential
Since she had such a huge backlog of posts, I started by narrowing it down to the ones that already had monetization in place, just to give myself some focus.

I chose this one:
Financial Travel Tip #109: Virtual Mailing Services
It was part of a series that she used to do, which we were planning to restructure anyway. It was also one of her top 10 posts, but it barely brought in 3% of her total traffic. I knew we could do better than that.
As for keywords, well Nora had told me that she had never written her posts around SEO, and the most she’d ever done was plug a random term into Yoast and try to get green lights.
Unfortunately, when I looked up the term she used for this post in ahrefs, it only gets 0-10 searches per month. So it wasn’t doing much good on the SEO-front, despite the green lights in the Yoast plugin.
The post was somewhere on the first 11 pages for 384 keywords, which isn’t very many, and most weren’t ranking very high. Only 13 of those keywords had this post on the first page, but they were all keywords that had barely any searches happening.
But…
I knew the post had potential.
It was a useful topic that I hadn’t seen any other travel bloggers talking about, so I knew it would be valuable for her audience.
It also had a basic explanation of how virtual mailing services worked, but not very thorough, so there was plenty of room for improving the content to be more in-depth.
There was also a list of links to different companies offering this service, but no text commenting on any of them. This left room for even more content, and also the chance to compete for “best of” or “review” type keywords.
And there were no images in the post. Leaving out images was leaving a strong on-site optimization opportunity on the table, so I planned to add plenty of relevant images that I could add alt-tags and title-tags to.
Step #2: Research and choose two main keywords
The next step was to research and find the right keywords to optimize the post around.
This would give me guidance on the basic on-site optimization, as well as what extra sub-topics could be added to make the post more in-depth.
Typically, when I do my keyword research for a piece of content, I choose two keywords: one that’s strong but definitely within reach, and another that’s more aspirational and a bit of a stretch goal.
This gives the post a chance to gain traction and traffic more immediately from the within-reach keyword, and as it gains SEO juice over time, a chance to keep growing and gaining more traffic as it climbs for the aspirational keyword.
For this post, I ended up landing on these two keywords:
-
- “Virtual mailbox” as the aspirational keyword, getting 4,200 searches per month and a relatively high Keyword Difficulty score of 45
- “Best virtual mailbox service” as the within-reach keyword, getting 500 searches per month and a Keyword Difficulty score of 6
Considering the stats for other keywords that The Professional Hobo was already ranking well for, “best virtual mailbox services” would be cake, and offered a decent number of searches per month compared to other long-tail keywords.
“Virtual mailbox” was going to be more difficult and take more time, but was doable. I knew she could compete for something with a 45 KD score, since the site overall already had a decent backlink profile (which makes sense given how long she’d been at it). And that search volume was to die for! Definitely worth the wait to get at those 4,200 searchers.
Step #3: Assess the competition for both keywords
This step is key to creating content that can compete in the SERPs.
In order to compete in the SERPs, your content needs to be even better than the content that’s already ranking on the first page.
For the term “virtual mailbox”, nearly all of the results on the first page were the actual businesses that provide the service. These would be more difficult to outrank.
But…
It didn’t overly concern me, because people interested in the kind of content the Professional Hobo post wouldn’t be interested in clicking on those companies just yet. They’d be looking for more unbiased information first, like reviews and overviews.
So, I was mostly concerned with any other travel bloggers who were writing posts like ours.
On the first page of “virtual mailbox” there was only one piece of content like that, so I focused my competition analysis on it.
For the term “best virtual mailbox service”, a lot of the real estate on the SERP went towards ads, and then a featured snippet from the same competing post as appeared for “virtual mailbox”. But in general, other than the ads, there were more review type content and only a handful of virtual mailbox companies.
I analyzed the other review type content, mostly posts from travel bloggers like the one I was working on, as well as some forum pages.
Their content was generally very similar, more in-depth than the original version of the post I was updating. Also, most of them also had very few backlinks and low Domain Authority (DA), which I knew wouldn’t be an issue for Nora’s post, since she already had DA 54 and a strong backlink profile in general.
Because of this I knew that if I beefed up the content to be as in-depth or more than these, I could get the page to outrank them.
Also, the same one that was on the first page for “virtual mailbox” was at the top of page 1 for “best virtual mailbox service”.
Drawing ideas from the competition
Looking over the competition’s content, I made a list of ideas of subtopics to add to the post, such as how to notarize your application while traveling, as well as sections to beef up and points to make sure it addressed in one way or another.
I made note of any virtual mailbox companies that were reviewed on other sites that weren’t in Nora’s post and added them to the list.
I also decided to add commentary for each business, listing pros, cons, and key features, which I could pull from the business’s websites, because some of the competition offered reviews, and it also primed the content to rank (albeit not highly) for brand-specific keywords.
Step #4: Expand and Update the Content
This is the fun part. Once I had an idea of what sections and subtopics to add and/or expand, it was time to actually write that new content.
Expanding different sections:
-
- The first thing I decided change was the Basics section, which started out with just the briefest explanation of what virtual mailbox services offered. So in this section I focused on going in more detail.
-
- I also took the Fees section in more depth, explaining the common variations in pricing as well as the different factors that cause differences in price.
-
- In the list of different virtual mailbox companies, the original simply had the link and the price range. I decided to go into more detail in the most popular ones, highlighting distinguishing features as well as offering a pros and cons list. This wasn’t possible for every single company, because some of them didn’t offer that much information on their sites, but I made sure to do the ones that the competing pages also reviewed.
- I also made some small additions to the Determining What You Need section that highlighted some more modern features that some services offer now that may not have been available when the post was originally published (such as software integration).
Adding whole new subtopics:
- One topic I found in the most in-depth competing articles was authorizing your virtual mail service with an online notary. This subtopic was only relevant to US readers, but was clearly an important detail for that demographic to be able to legally sign up for them. It was also clearly an important addition to be able to compete for the high rankings. Plus, it offered a new affiliate program opportunity.
Step #5: On-site Optimization
Once the content itself is updated and organized, the next step was doing some basic on-site optimization.
Nora had told me that she’d never really taken SEO into consideration when she’d written her content before, so I knew every opportunity was available.
Optimizing the headline
First I optimized the headline. My favorite tool to come up with headlines is CoSchedule’s Headline Analyzer, a free tool that helps you write strong, emotive headlines. It doesn’t take SEO into consideration, but by combining my SEO know-how with it’s features, it becomes a super handy and effective tool.
To make it super strong for the stretch goal keyword, I put it at the very beginning of the headline, with a colon, and then put the emotional and travel related components after. It took a few tries to get the right combo and a decent (70+) score in the Headline Analyzer, but I ended up with “Virtual Mailbox: The Easy Way to Get Mail When You Travel”.
Optimizing sub-headers
What with all the different sections in the first half, and then the list of all the different companies in different countries, there were plenty of sub-header opportunities for keyword placement.
-
- I retitled the Basics section as a question, “What is a Virtual Mailbox Service?”, with the goal to gain a People Also Ask… SERP feature or a Featured Result box.
-
- Most of the headlines included some direct reference to the services itself, so I changed most of them to “virtual mailbox service” rather than “virtual mailing service”, since the latter didn’t get any search volume. I made sure to tweak the exact phrasing or grammar in most of them, though, to avoid over-optimization.
- The subheader before the list of companies was changed to “Virtual Mailbox Comparison”, because that was a long-tail keyword that I found in my research and I knew that with this long list (longer than most of the competition), this content would be super relevant.
Adding and optimizing images
The original version of this post had absolutely no images, which made for dull eye candy.
I added a couple of mail related stock images and made sure to compress them with ShortPixel before uploading. Then I added descriptive alt and title tags that simultaneously included keywords as well as describing what was in the photo.
I also included logos for each of the companies listed in the post.
This gave the opportunity to optimize more alt and title tags, and I also made them clickable with affiliate links (where relevant). That helped them contribute to SEO as well as potentially boosting affiliate income.
Publish date
Because the post had been several years old, and I wanted people to have confidence in the content when they found it in the SERPs, so I decided to change the publish date in WordPress.
I personally believe that old publish dates can discourage clicks, which not only hurts your traffic, but decreases click-through-rate, which can hurt your SEO ranking over time.
I also made a note in the editorial content that said “Updated For 2018: Latest rates and details below!” to reiterate that confidence and let readers know that this is quality content that is regularly updated (or at least will be from now on!).
URL slug
Most of the time, for a new post, I always optimize the slug around the keyword and try to keep it short.
In this case, though, I decided it was best to keep the URL as-is. It was basically just a replica of the original headline in URL form, but the SEO benefit of the new slug wouldn’t justify the loss of redirecting the old URL and losing the juice it already had.

Conclusion
And that’s how we increased traffic to Nora’s post by 450%! (with a direct positive impact on affiliate income!)
The best part is, you can do this too! Just follow this same step-by-step process with your own blog and you’re off to the races.
Was this case study inspiring for you? I’d super appreciate if you shared it on Facebook!
Have you tried this for yourself? Let me know how it went in the comments below!
Free SEOtastic Flowchart & Checklist
For someone like me who struggles with SEO, this post is gold! I love the idea of choosing two keywords – an aspirational one and one that’s in reach – but I’m terrible at keyword research. I have a hard enough time finding one good keyword. I get the concept but maybe I lack the imagination. I don’t know. I use keysearch.io and spend hours searching but never seem to find a winner.
Looking forward to learning more in your SEO foundations course.
Yay! I’m glad it’s helpful! Yeah keyword research is tough without strong tools. Keyword.io is great for generating new ideas and long-tail keywords, but it doesn’t give search volume or difficulty scores, which is key. Moz has a freemium version of their Keyword Explorer tool though, and that’s how I started! (though I pay for Ahrefs now). I hope that helps!
I found this article very useful, I’ve taken notes and will see whether I can apply the type of changes you recommend. You make it sound doable, but with so much else going on while I try to revamp and rebrand I may not have the time. If that’s the case, I’m confident you’re the person for the job (when/if I can afford to pay a professional!)
Thank you for sharing this article, you explained every bit in a way that makes it all seem less out of my league or above my head. Fingers crossed.
Yay! I’m so glad to hear that it was helpful and made it all less intimidating! That’s 100% my goal 😀
And don’t be afraid to reach out if you’re that busy! I totally understand having a million things on the stove, so I totally get it. You may want to sign up for the waitlist for my new keyword research course, if you’re planning to DIY. Otherwise, definitely reach out and we’ll see how I can help!
Best of luck with your rebrand!